STM32 Project From Scratch on Eclipse
If you want to use the popular STM32 ARM series of microcontrollers but you don’t like using example projects or templates and want to create your development environment from scratch, you are at the correct page. I will explain step by step how to create a project on Eclipse.
Brief
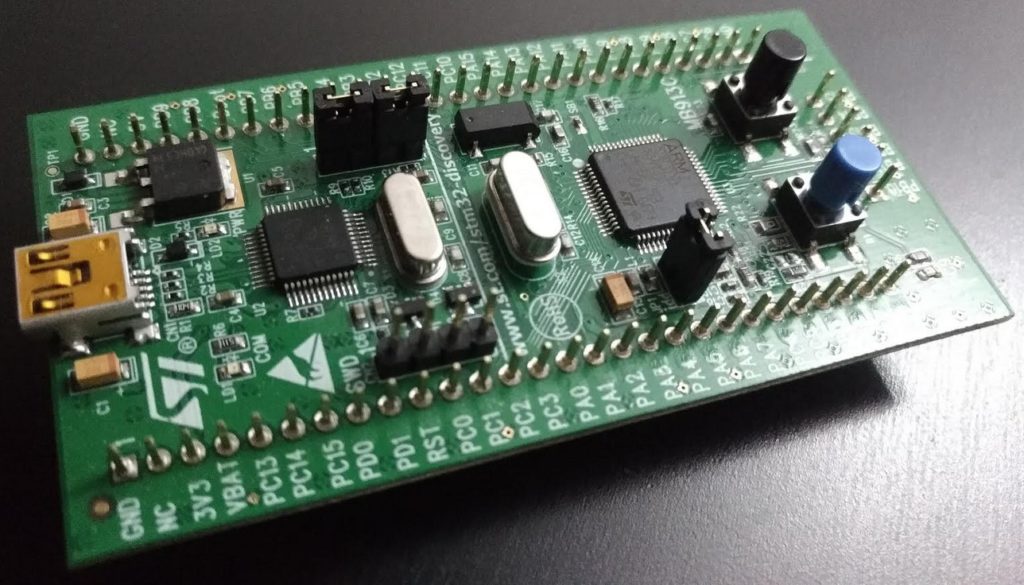
Here I use my STM32VLdiscovery board, which is the most basic development kit for ST’s STM32F10x series ARM Cortex-M3 (STM32F100RB) chip. Then I create a project on Eclipse equipped with GNU MCU Eclipse environment.
Prerequisites
Be sure that you have all the steps below in order to start creating the first project.
- Eclipse CDT (Oxygen) with GNU MCU Eclipse is installed. Follow the instructions on this post.
- GNU ARM Toolchain (gcc-arm-none-eabi-7-2017-q4-major) provided here.
- Download STM32F10x standard peripheral library (STM32F10x_StdPeriph_Lib_V3.5.0) here.
- STM32F10x board to debug (Optional).
Hands-on
Creating an empty project
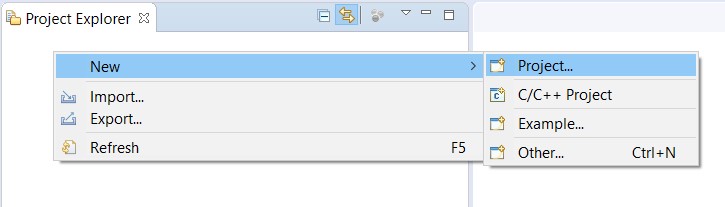
Start Eclipse and go to Project Explorer, then right-click to create a project.
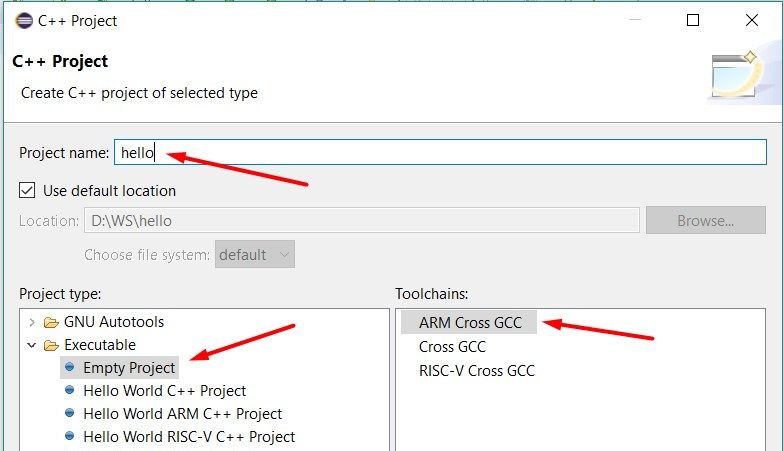
 Now head to “C++ Project” under “C/C++” section and choose “Empty Project” under “Executable” and write the most creative name you can find for your first project.
 Click “Next” and “Finish” with both “Debug” and “Release” configurations. Now you can start creating project folder structure.
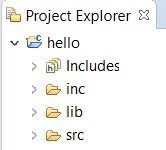
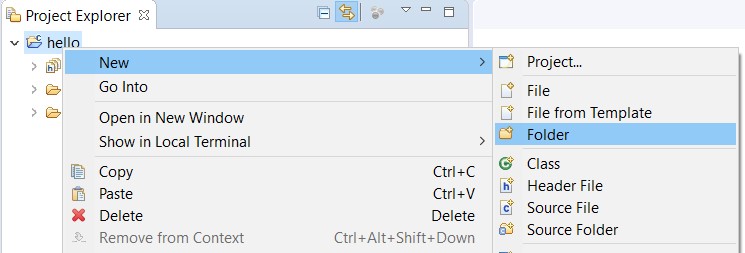 We need “src”, “inc” and “lib” sections and finally the project will look like the following. Lib stands for MCU specific libraries; specifically stdperiph, CMSIS and linker script in this example project.
 MCU Peripheral Libraries
Extract the contents of stdperiph archive and copy everything under “Libraries” folder (CMSIS and STM32F10x_StdPeriph_Driver) into “lib” folder of the project.
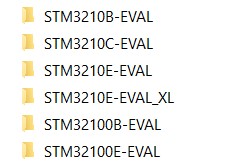
We will need a linker script to tell the linker to place everything to correct locations of RAM and Flash. Some sample linker scripts are hidden in the peripheral library archive. Luckily the script stm32_flash.ld given under Project/STM32F10x_StdPeriph_Template/TrueSTUDIO/STM32100B-EVAL can be used directly for STM32F100xB (128kB Flash, 8kB RAM). For other variants, you can either adjust the memory ranges in this script by modifying the following (here is a good tutorial)
MEMORY
{
  FLASH (rx)      : ORIGIN = 0x08000000, LENGTH = 128K
  RAM (xrw)       : ORIGIN = 0x20000000, LENGTH = 8K
  MEMORY_B1 (rx)  : ORIGIN = 0x60000000, LENGTH = 0K
}
or find another script for another development board that is closer to your needs.
 Create Source Files
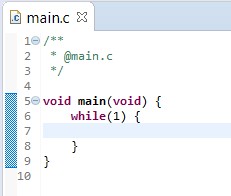
We need to create a main function somewhere and obviously the perfect location is a main.c file under src folder of the project. Now we can create a dummy file like the example below. We don’t need to include any headers for the time being.
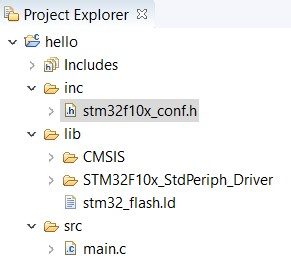
 The second mandatory file is a special header file called stm32f10x_conf.h and somebody has already provided one for us under Project/STM32F10x_StdPeriph_Examples/ADC/3ADCs_DMA. Now after we add these two mandatory files into the project structure, be sure that project explorer looks like this.
 Startup File

Startup file is the most important file in my opinion. In contrast with most people’s misunderstanding, the first line of main function is obviously not the first code executed by the processor. There is a long way from the reset vector of the execution memory to the beginning of our application code. This covers;
- initialization of static values in .data section.
- zero-filling of .bss section.
- execution of initializer functions and/or static constructors in .init_array.
- calling main function.
- execution of destructors in .fini_array sections. (Refer to here)
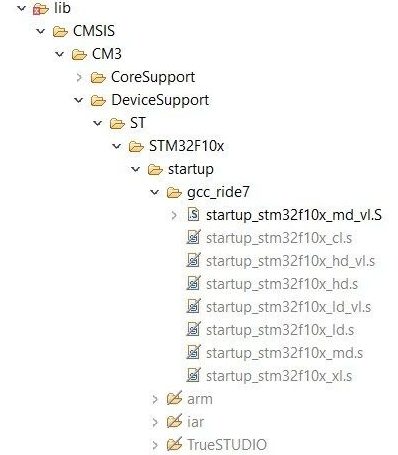
Different compilers are supported in stdperiph and we need to exclude the unnecessary ones: arm, iar and TrueSTUDIO under lib/CMSIS/CM3/DeviceSupport/ST/STM32F10x/startup (for Debug and Release).
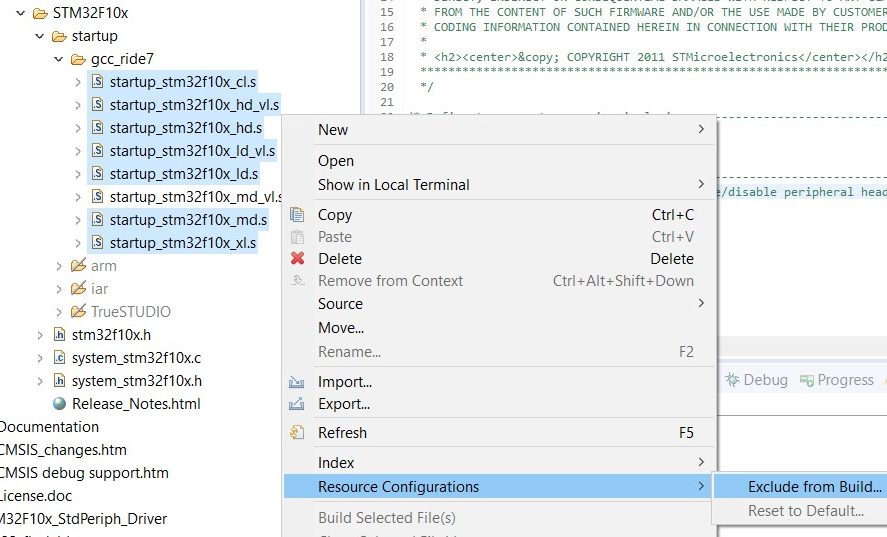 In gcc_ride7 folder, exclude all expect the startup file for your microcontroller. STM32F100RB is medium-density and value-line. So I excluded all expect startup_stm32f10x_md_vl.s. Finally, we need to rename the file to startup_stm32f10x_md_vl.S (uppercase .S or .asm extension) for Eclipse to see it as assembly file.
Project Settings
Once the project file structure is ok, we need to do some project settings. Simply go to Propertiesby right-clicking to the project in project explorer, then go to C/C++ Build and Settings.
Chip and Board Definitions
Go to GNU ARM Cross Assembler/Preprocessor and add definitions for STM32F10x_MD_VL (can be different in your application), The crystal oscillator frequency (if any) HSE_VALUE=8000000 and USE_STDPERIPH_DRIVER to enable peripheral library.
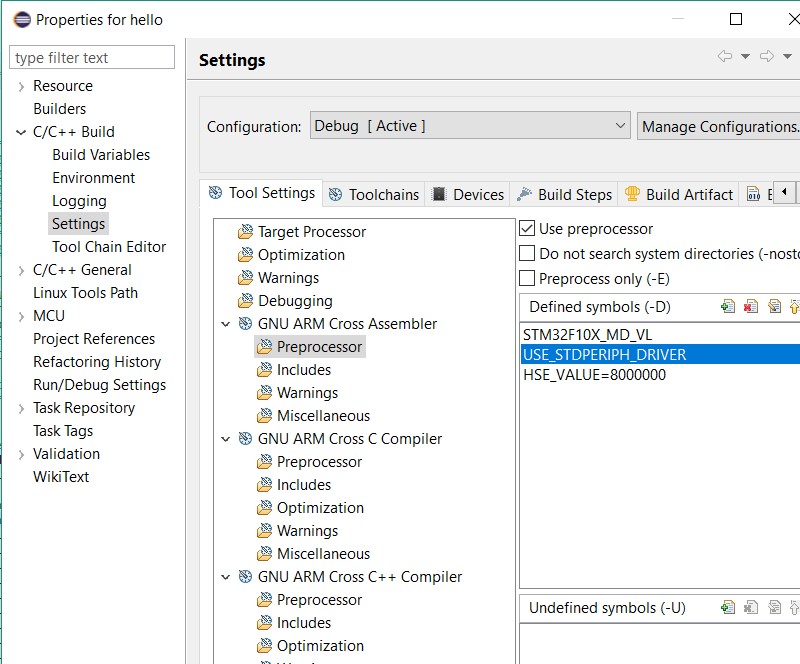
Add the same definitions to GNU ARM Cross C Compiler and GNU ARM Cross C++ Compiler sections too.
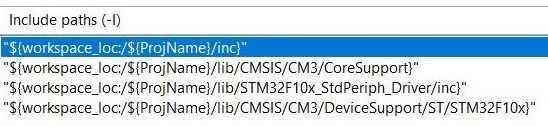
Include Paths
Add the library paths to Includes section of GNU ARM Cross Assembler, GNU ARM Cross C Compiler and GNU ARM Cross C++ Compiler as shown below.
 Finally it should look like below.
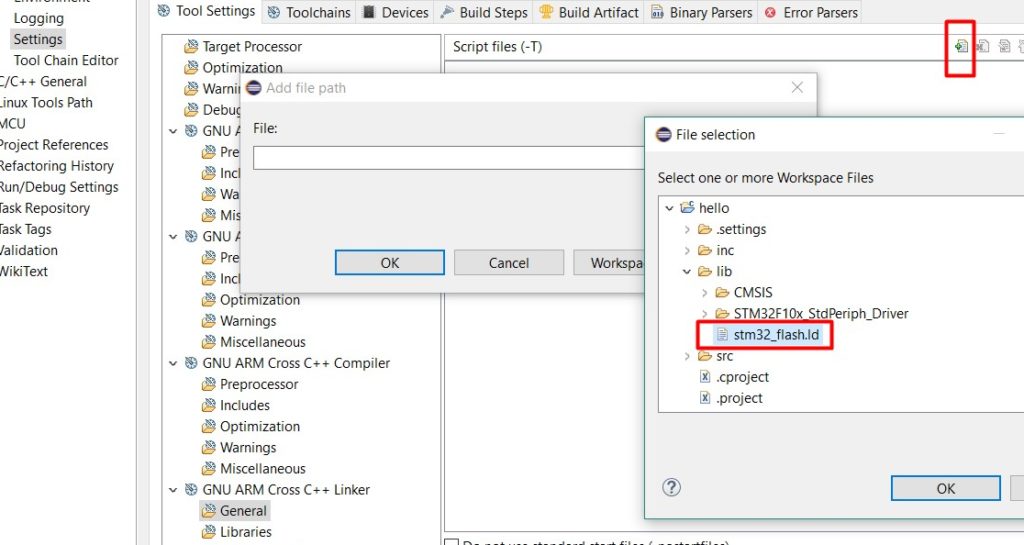
 Linker Script Path
To show the linker the path of our script, add its path to GNU ARM Cross C++ Linker/General.
 Compilation
Now the project is ready to compile. But when you try to compile, see the following error in core_cm3.c which is a well-known bug of current version of CMSIS.
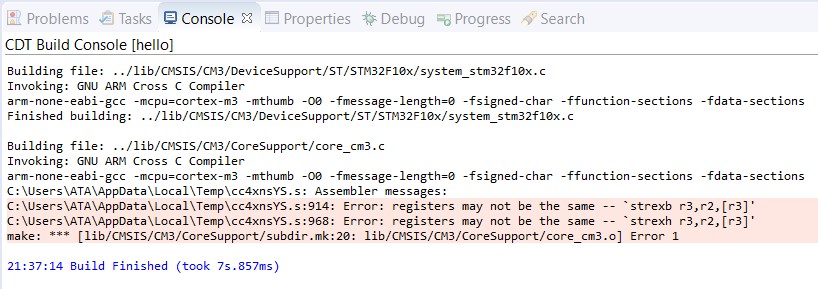
In core_cm3.c find the lines:
__ASM volatile ("strexb %0, %2, [%1]" : "=r" (result) : "r" (addr), "r" (value) );
__ASM volatile ("strexh %0, %2, [%1]" : "=r" (result) : "r" (addr), "r" (value) );
and change into:
__ASM volatile ("strexb %0, %2, [%1]" : "=&r" (result) : "r" (addr), "r" (value) );
__ASM volatile ("strexh %0, %2, [%1]" : "=&r" (result) : "r" (addr), "r" (value) );
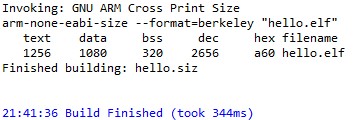
Now you can see the code compiles.
Debugging
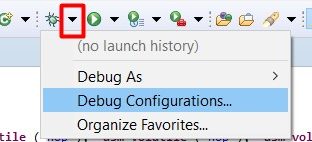
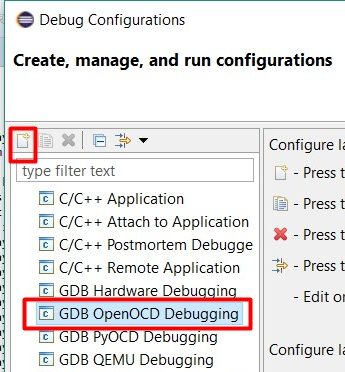
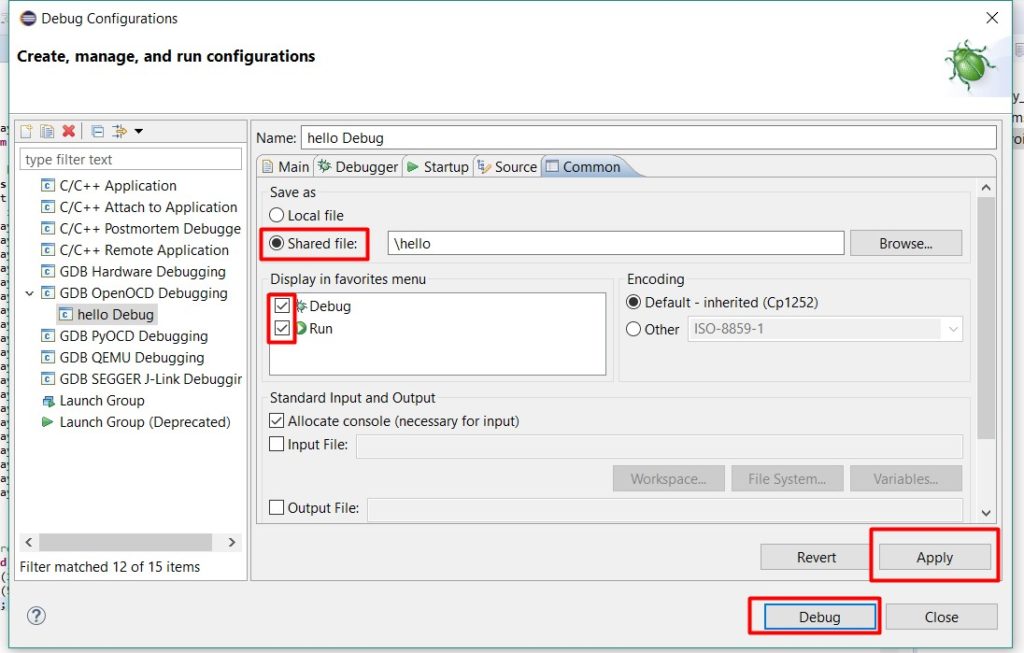
Here is how to enable OpenOCD debugging in your project. Go to Debug Configurationsand create one.
Create a shared file for Debug and Run under Common tab.
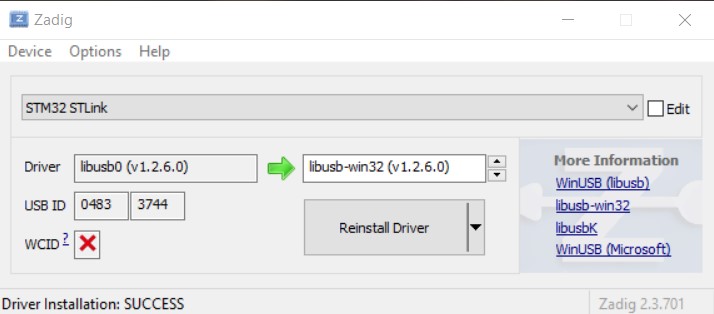
Finally, install STLink driver from here but this is not enough for OpenOCD to connect. Download Zadig tool and install libusb-win32 driver for STLink. If it is not visible on the list, go to Options, List All Devices.
After this step, you are ready for debugging ?
Demo Code
It’s time to see our project in action. Here s a sample main.c file for blinking an LED.
/**
 * @file      main.c
 * @author    Atakan S.
 * @date      01/06/2018
 * @version   1.0
 * @brief     LED Blinker for "STM32 Project From Scratch on Eclipse" demo.
 *
 * @copyright Copyright (c) 2018 Atakan SARIOGLU ~ www.atakansarioglu.com
 *
 *  Permission is hereby granted, free of charge, to any person obtaining a
 *  copy of this software and associated documentation files (the "Software"),
 *  to deal in the Software without restriction, including without limitation
 *  the rights to use, copy, modify, merge, publish, distribute, sublicense,
 *  and/or sell copies of the Software, and to permit persons to whom the
 *  Software is furnished to do so, subject to the following conditions:
 *
 *  The above copyright notice and this permission notice shall be included in
 *  all copies or substantial portions of the Software.
 *
 *  THE SOFTWARE IS PROVIDED "AS IS", WITHOUT WARRANTY OF ANY KIND, EXPRESS OR
 *  IMPLIED, INCLUDING BUT NOT LIMITED TO THE WARRANTIES OF MERCHANTABILITY,
 *  FITNESS FOR A PARTICULAR PURPOSE AND NONINFRINGEMENT. IN NO EVENT SHALL THE
 *  AUTHORS OR COPYRIGHT HOLDERS BE LIABLE FOR ANY CLAIM, DAMAGES OR OTHER
 *  LIABILITY, WHETHER IN AN ACTION OF CONTRACT, TORT OR OTHERWISE, ARISING
 *  FROM, OUT OF OR IN CONNECTION WITH THE SOFTWARE OR THE USE OR OTHER
 *  DEALINGS IN THE SOFTWARE.
 */

#include <stm32f10x.h>

// SysTick interrupt handler.
void SysTick_Handler(void) {
	// Toogle PC9.
	GPIO_WriteBit(GPIOC, GPIO_Pin_9, !GPIO_ReadOutputDataBit(GPIOC, GPIO_Pin_9));
}

// The main routine.
int main(void) {
	GPIO_InitTypeDef GPIO_InitStructure;

	// Enable peripheral clocks.
	RCC_APB2PeriphClockCmd(RCC_APB2Periph_GPIOC, ENABLE);

	// Configure PC9 output pushpull mode.
	GPIO_InitStructure.GPIO_Pin = GPIO_Pin_9;
	GPIO_InitStructure.GPIO_Mode = GPIO_Mode_Out_PP;
	GPIO_InitStructure.GPIO_Speed = GPIO_Speed_50MHz;
	GPIO_Init(GPIOC, &GPIO_InitStructure);

	// Start SysTick at 1Hz.
	SysTick_Config(SystemCoreClock);

	// Enable Interrupt.
	__enable_irq();

	// Infinite loop.
	while(1);
	return 0;
}
Here we can see that the peripheral library and CMSIS functions can be called from application code. Download link for the created project is also here in case if you have any trouble.
Conclusion
Since this project only works for STM32 micros, it is still a mystery to create a universal project that works with all ARM processors. Although there are many efforts made to achieve this on GitHub, still no general solution exists for all ARM family. Some while ago CoIDE from CooCox was a good alternative but looks like they are having some trouble and support is questionable. Currently it sounds reasonable to stick with KEIL MDK ARM since it supports the widest set of vendors, if this is what desired. Stay up to date ?